Since July 6, 2023, Atlassian has no longer been used for Release Notes or knowledge base articles.
* Find Release Notes here (https://support.mycontactcenter.net/app/articles/detail/a_id/23378/) and articles here (https://support.mycontactcenter.net/app/main).
* Authenticated Partners can access content here (https://support.mycontactcenter.net/cc/sso/authenticator/oauth/authorize/imcontrolpanel?redirect=main&source=mycontactcenter)
Add Shift
To create a shift:
- Click Add Shift, located at the top of the tab.

2.The Shift Manager window opens. The Shift Manager is divided into the following eight sections: General Information, Timing Information, Lunch Information, Summary, Applicable Days, Shift Color, Manage Breaks, and Notes. Complete all fields in each of the eight sections (see below for Shift Manager screen and refer to Table 2 for a detailed description of each section).
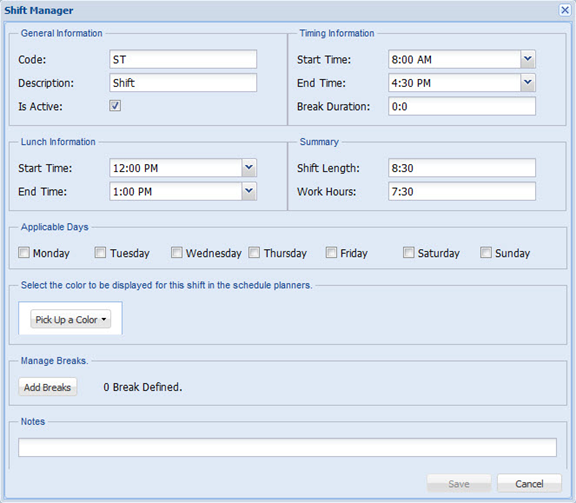
3. Click Save when all fields are complete.

Note: If you don’t want to create the new shift, click Cancel.
4. A Save Shift confirmation window appears. Click OK.
5. The new shift is added to the list of shifts.
Table 2: Shift Manager Field Descriptions and Button Functions | |
General Information | |
Code | Enter an identifier for the shift, typically a short form used to reference the name of the shift (e.g. MO refers to the Monday shift) |
Description | Enter a name for the shift (e.g. Monday shift) |
Timing Information | |
Start time | In the drop-down menu, select the Start Time for the shift. |
End Time | In the drop-down menu, select the End Time for the shift. |
Break Duration | The total length of time allotted for coffee breaks during the shift. If more than one break occurs during the shift, the total time of all breaks combined will appear here. The break duration is calculated automatically. Note: If breaks are assigned to a shift, everyone will have the same break time unless you enter different shifts for each individual. |
Lunch Information | |
Start Time | In the drop-down menu, select the Start Time for the lunch break. |
End Time | In the drop-down menu, select the End Time for the lunch break. |
Note: If you are working with a larger team, you can split up the lunch so not everyone is taking a lunch break at the same time; this can be done manually in the schedule. For further information, refer to Section 5: Schedules. | |
Summary | |
Shift Length | The total length of the shift (e.g. 8:30 = 8 hours and 30 minutes). The shift length is calculated automatically. |
Work Hours | The total number of hours worked, any breaks such as coffee breaks or lunch breaks are not included in this total. For example, if an agent works a 9-hour shift, but took two 15 -minute coffee breaks (30-minute total) and a 30-minute lunch break, the total Work Hours would be 8 hours. Work Hours are calculated automatically. |
Applicable Days | |
Monday – Sunday | Select the days of the week on which this shift is available (e.g. If the shift is only available on Monday, select Monday, if the shift is available all week, select Monday, Tuesday, Wednesday, Thursday, Friday, Saturday, and Sunday, etc.). |
Shift Color (optional) | |
Pick Up a Color | In the drop-down menu, select a color to symbolize the shift and click Select Color (e.g. select the color orange and the shift will appear in orange on the agent’s schedule). Color coding the shifts allows you to look in the schedule and quickly identify a certain shift/team/group of people. |
Manage Breaks | |
Add Breaks | Click to add breaks to the shift. If selected:
Breaks are specific to the shift created, not to the agent, therefore if the Monday shift has a morning break at 9:00 AM to 9:15 AM, only agents working the Monday shift would take the 15-minute break at the scheduled time. If you are working on the Tuesday shift, your break might occur at a different time. |
0 Breaks Defined | Indicates the number of breaks scheduled for the shift. When creating a new shift, there will be 0 Breaks Defined. |
Remove Breaks (Available when Add Breaks is clicked) | If you have added one or more breaks to the newly created shift that you would like to remove:
Note: If you would like to change the time for a defined break, you must first remove the break from the shift and then add a new break with the new break times. When done, click Close to close the dialog box. The Breaks Defined message will change accordingly depending on how many breaks have been removed. |
Notes | |
Type any notes regarding the newly created shift. | |
Buttons | |
Save | Click to save the shift information. The new shift will be added to the Shift table. |
Cancel | Click to cancel the newly created shift. The information for the new shift will be deleted and will not appear in the Shift table. |
Since July 6, 2023, Atlassian has no longer been used for Release Notes or knowledge base articles.
* Find Release Notes here (https://support.mycontactcenter.net/app/articles/detail/a_id/23378/) and articles here (https://support.mycontactcenter.net/app/main).
* Authenticated Partners can access content here (https://support.mycontactcenter.net/cc/sso/authenticator/oauth/authorize/imcontrolpanel?redirect=main&source=mycontactcenter)